
We’ve the privilege to share a dinner in Lisbon with Jose Alves Da Silva last week. It was the perfect moment to speak about the earlier day of IAMAG and as we’re talking about his famous illustration, ‘Le Rabbit’, I thought it was the perfect timing to repost this classic making-of.
Thanks a lot Jose and don’t miss his website, there’re a lot of affordable awesome prints there!
IAMAG Master Classes : Get into the creative process of the best artists

“Le Rabbit” can not be described as the result of an extremelly well organized and planned process. In most of my personal work I give priority to the “fun factor” and try to keep the whole process really enjoyable. So, I try not to plan everything in detail at the start and tend to leave a lot of decisions to be made along the way in order to keep all the phases creative.
During the creation of this image I have bumped into several problems, especially regarding the fur. I am not a digital hair expert and I had to face some questions for the first time. These problems may sound basic to a part of the readers but I have decided to talk about them and the way I have solved them because some of you might consider these tips valuable. Regarding the motivation to create this piece, I had been wanting to make a more cartoonish character for ages, because this is a type of language at which I feel really comfortable. An image about a humanized rabbit with lots of attitude started forming in my mind… and what was supposed to be a modelling exercise of a few days ended up being a finished piece that took me about 2 months! Jose Alves da Silva
Modeling
 From the beginning I had the intention to sculpt the model in Zbrush.
At the time I was not so familiar with Zspheres and I wanted to make sure that the character had enough detail in certain important areas like the snout, so I have decided to go old school and create a low poly version of the rabbit with a good topology for further detailing in 3DS Max.
I have created a box with a few subdivisions and applied the “Symmetry Modifier” on top in order to create a mirror axis at the center of the body. Then I have applied an “Edit Poly Modifier” below the “Symmetry Modifier” and started editing the polygons with “Show end result” turned on so that I could see all my editing being mirrored to have a clear idea of the full silhouette. The usual “Edit Poly” tools like Extrude, Chamfer, Connect, etc. were used to create a T-Pose version of the character. I have created some extra edge loops around the joints (elbows, neck, wrists, knees, shoulders) so that I could pose him later and have enough polygons to work with at the deforming areas. Also, I have decided to model the fingers individually rather than a full volume for the hand, so that later I could position the fingers accuratelly.
One thing that I have learned from previous projects is that it is very important to have the eyeballs’ geometry present while we model a face. It is very easy to model incorrectly the area around the eyes, especially the eye socket area and the way the eye lids contact with the eyeballs. So, I have created 2 Spheres in the place of the eyes to guide me. In this particular case the eyes have different sizes. I have made this to emphasize the rabbit’s expression and really exagerate the lift of the eyebrow. It also contributes to the wacky feeling of the character. The basic shape of the front teeth and the gums were also created at this stage to help me with the modelling of the snout and to make sure they fitted well.
UV Mapping
 Usually, at this stage, I take care of the UV mapping. It is a good time to do it because the geometry is still quite simple and easily identifiable on the UV layout. If you leave it for later you will have to deal with thousands of polygons and the process might not be so simple. I have tried to minimize the distortion of the mapping as well as keeping as much continuous skin as possible. The advantage of keeping the geometry mapping continuous is the fact that you can paint over large areas without worrying about the continuity of the texture between different parts of the model.
Also, I have kept all the different parts on the UV Layout at the same scale. I could have used some more texture space for the head, for example, but then I would have the problem of different pixel scale on different parts of the model. Fortunatelly, to deal with the continuity problems on the edges of the different parts I could count on ZappLink, but we will talk about that later. For the UVs unwrapping I have used the Unfold3D application.
Zbrush
 After setting the UVs I have attached the gums, teeth and eyes to the body mesh and exported it in OBJ format, which was effortlessly imported into Zbrush.
With the mesh inside Zbrush, I have used the Tools>Polygroups>Auto Groups option to easily separate all the elements into different polygroups. Then in the Subtools menu I have chosen GroupSplit to automatically place each polygroup into a separate subtool. This way, the eyes, gums and teeth were stored as individual subtools.

The following step, a very important one, was to define the polygroups of the main body. By separating the mesh in different groups you can hide/mask parts of the body during the sculpting stage. This allows you to reach inaccessible areas after posing and making selections for transposing a lot quicker. With the model in a T-Pose it is very simple to make the selections to define the polygroups. I have defined the polygroups according to the anatomy of the body: head, torso, arms, forearms, hands, thighs, legs and feet. Later, for hand positioning, I also had to separate each individual finger into a polygroup.
Usually, I use the Symmetry tool while sculpting for as long as I can, in order to minimize doubling the work in certain parts of the body, however this project was not the case. The pose of the rabbit was my main concern and I wanted his muscles to bulge and shape correctly according to their final position, so I took the option of posing each body part first and shaping its anatomy later.
![]() I have used the Transpose tool for all the posing, mainly by masking the part I wanted to position, inverting the mask selection, setting the transpose Action Line as if it was an actual bone and rotating it around the joint. (Fig.5) After the rotation, it is common that the joint area doesn’t deform exactly as you would like, but a few brush strokes can usually fix that. The polygroup distribution was really handy at this time allowing for a fast selection.
I have used the Transpose tool for all the posing, mainly by masking the part I wanted to position, inverting the mask selection, setting the transpose Action Line as if it was an actual bone and rotating it around the joint. (Fig.5) After the rotation, it is common that the joint area doesn’t deform exactly as you would like, but a few brush strokes can usually fix that. The polygroup distribution was really handy at this time allowing for a fast selection.
Regarding the sculpting technique, there is nothing new about it, I mainly used the Move tool for reshaping, the Clay tool for sculpting (I find it more controllable than the Standard brush), the Inflat tool for muscle bulging, the Flatten tool to smooth the surface (I prefer it over the Smooth tool for this purpose) and the Smooth  tool for untangling the surface when deformations get ugly, especially at the inner parts of the joints after transposing, where geometry tends to self-intersect.
I have prepared an image in which you can see the evolution of the sculpting phase.
As I have mentioned, my main concern was the pose because it defines the personality of my character. I have tried to achieve a natural pose by shifting the charcter’s weight to his left leg and tilting the hip so that his right leg could advance a bit while keeping both knees locked, resulting in a comfortable standing position. I have also tilted the shoulder line and lowered the head in the opposite direction while the eyes keep looking to the side, in order to give us “that” look.
 The raising eyebrow is also emphasized by the ears, as the rabbit’s right ear, above the bigger eye, points up and the left ear curls down in continuity with the spine curve. The rabbit’s right hand, which will later hold a cigarette, was also positioned with an exaggerated angle backwards not only to be more expressive but also to create a negative space between the hand and the cheek so that the silhouette is clear without an overlapping.
ZAppLink
 All Pixologic’s plugins are worth checking but my favorite is definitely ZappLink (you can download it here). This plugin projects the image in Zbrush’s document screen into Photoshop, where you can use all your favorite tools to paint your model and then project the result back to the model texture in Zbrush!
I have started by picking a white image with 4096×4096 pixels as my model texture. Then I have activated ZappLink (under the Document Tab) with Photoshop already open in the background. Choose “Drop Now” and Photoshop will pop up with the Zbrush image. The document has a layer order and naming convention that you will have to keep in order for everything to work as expected.
 Add as many layers and blending modes as you want as long as in the end you collapse all your painting to a layer with the name “Layer1” with the original mask. Then save the image and go back to Zbrush, choose “re-enter Zbrush”, choose “Pick up now” and the painting will be applied to your texture. Do not forget to save the changes to your texture by going to the Texture tab and choosing “export”.
To continue painting the model you just have to change your point of view and project the image again through ZappLink and keep repeating the process until you’re done. You can even hide parts of the model before making the projection in order to paint inaccessible areas. This is how I have painted the diffuse texture of my character. (Fig.9)
The remaining textures (specular, bump, SSS, etc) were fully painted in Photoshop using the diffuse texture as a base.
The Fur
I have exported the hipoly model in OBJ format and imported it into 3DSMax. The model had about 320 000 polygons and my new task was to cover it with fur. As you know, when using the “Hair and Fur (WSM)” modfier, a hair guide spline will be created for each vertex. By manipulating these guides you will define how the hair will grow, as the software will make an interpolation between the vertex splines in order to create the hair strands in the area between the guides.
However, growing the hair on a 300K poly mesh is not an option. No one wants to deal with 300 000 guides, not to mention that the software will not allow it. The only option is to use a lowpoly mesh to grow the hair. So, I have exported the mesh from Zbrush at a lower subdivision level with about 5000 polygons.
 Using a lower subdivision mesh brings another issue: the polygons of the high and lowpoly models are not coincident, some vertices are below the surface of the high resolution mesh and other are above. Having hair growing in the air at a distance from the hipoly mesh is a problem, but having the hair grow below the surface is actually desirable. As such, I have applied a “Push” modifier with a negative value to the lowpoly mesh in order to shrink it below the hipoly surface. Then I have turned off the “Renderable” option under the “Object Properties”, so that the lowpoly mesh didn’t render (the hair will render indepent from the fact that the mesh will not). Then I applied the “Hair and Fur (WSM)” modfier and the titanic fight for hair control started…
 In this project I have found that the best way to control hair is to shorten it drastically and get rid of all the randomizing parameters at the beginning. Here are the steps to do it:
-Go to “Frizz Parameters” and reduce the “Frizz Root” and “Frizz Tip” values to zero. Then choose “Style Hair”, increase the brush size so that it covers the whole model, remove the “Distance Fade” option, pick the “Scale” option and drag-click to the left over your model until the hair guides are really short. Then, in the “Utilities” box click on the “Recomb” button so that the hair falls along the surface. After, you can choose the “Stand” option inside the “Styling” box, drag-click to the right slightly over your model to raise the hair guides a little. This should give you a good starting point. After that, grow and comb the guides in small areas at a time, hiding the rest of the guides. It is a work of patience, lots of…
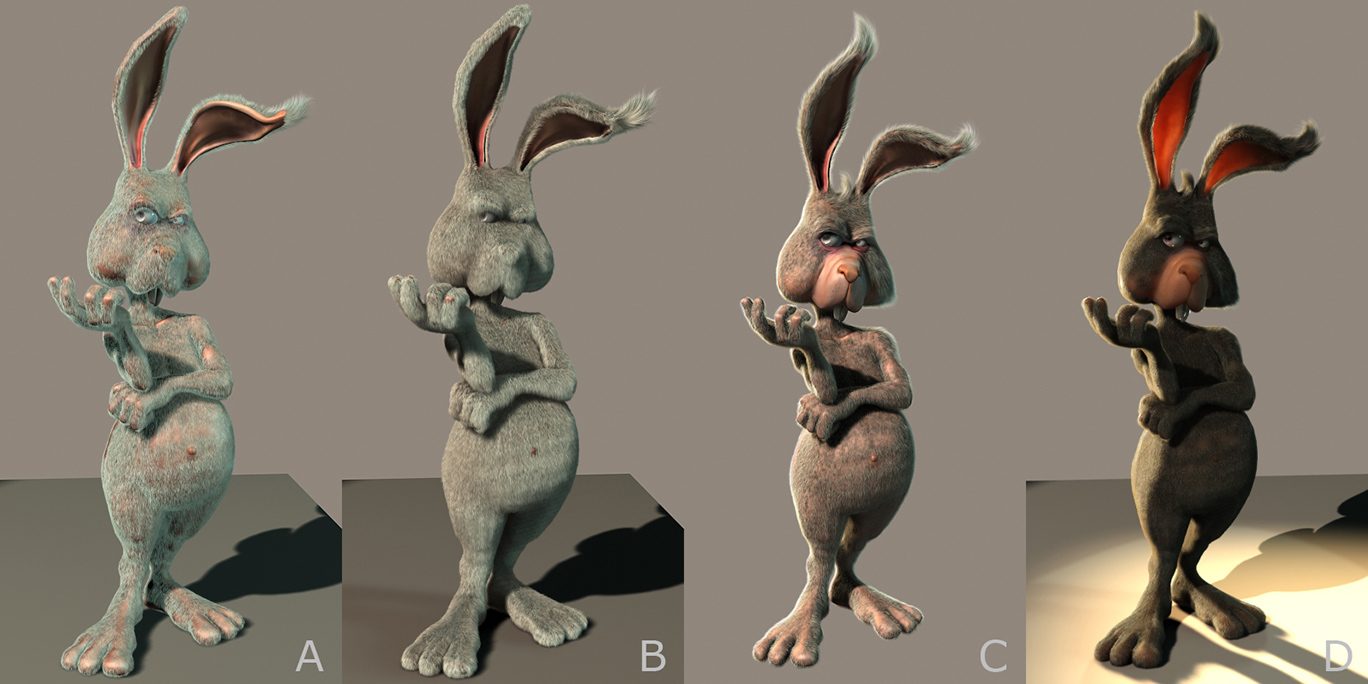
Another thing I have learned in this project is the obvious fact that fur adds volume to the character (duh!). All of a sudden, the nice sculpting details were covered by a thich layer of hair… I had to invest a lot of time in combing the guides to make the fur flow along the skin surface and keep a sharp silhouette. This image (Fig.11) shows the evolution of the combing and also the lighting.
 It also came as a problem that the hair doesn’t look the same when rendered at different resolutions, it was very difficult to spot mistakes and decide for the correct density at low resolution renders. In order to be able to test the hair correctly, I have created a test scene with a single light, without any shadows or GI and just a simple diffuse material for the skin mesh. Most of my hair render tests were made in this scene at about 3000 pixels and with render times around 2 minutes.
After having reached the conclusion that I needed a hair count of about 2 700 000 hairs (!) another problem came up… I just couldn’t render anything larger than the 1500×3000 pixels resolution. I have used the “hair buffer” method for hair rendering (“mrprim” and “geometry” couldn’t handle this amount of hair) and at the time of rendering only two thirds of the hair showed up. Later, I have discovered that there is a 70 MB buffer to write the hair to, and at higher resolutions this buffer value is not sufficient. In order to fix this go to “Effects>Hair and Fur” and inside the “Buffer Rendering Options” increase the “Tile Memory Usage” and that will solve the problem. The bigger the resolution, the bigger the buffer. Sounds simple when you know what to do…

 Above you can see the 3 different base meshes I have used to grow hair on the body, snout and tail as well as the hair count for each. The hair guides are represented in yellow.
I have compiled all the numbers used to generate the final hair. For the “Tip Color” and “Root Color” I have used textures with a brownish tone, brighter for the tip and slightly darker for the root. Don’t forget that the color swatches for the Tip and Root multiply by the texture color, so change the swatches to white, otherwise it will affect the texture color. The picture shows the hair resulting from the guides and settings previously described.
The Skin

 The renderer I have chosen for this project was V-Ray, a long time companion.
The 1.5 SP3 version of V-Ray presents a new excellent shader, the Vray Fast SSS2. It was created to make subsurface scattering materials fast and easy. I have used this shader for the first time in this project and it is very similar to MentalRay’s SSSFastSkin Material. I confirm that it is blazzing fast! Subsurface scattering was crucial in this piece because I had set up a strong light from the back and it allowed me not only to emphasize the rabbit’s silhouette but also to represent the characteristic translucent effect in the ears. You can check the used textures and shader settings as well as the render result of the applied skin material. You will notice, by examining the fingers on the right hand, that the subsurface scatter radius is a little bit exagerated, however the important part were the ears as the rest would be covered by hair.
The Eyes
 For me, the most important part of a character are the eyes. Unless you are representing a dead corpse, if the eyes do not look alive, you will ruin the entire piece. People look at each other’s faces all the time and the main focusing point are the eyes. We are so used to observing eyes that if something is wrong in their representation we will immediately spot it. I believe that there are the 9 essential points in the eyes’ representation that have to be to nailed in order for your character to look alive :
a– Shadowline below the eye lid falling on the iris.
b– Bright highlight revealing the strong light sources – I have used and HDR image on the environment to achieve this.
c– Highly reflective cornea (not forgetting the Fresnel effect).
d– Reflection/Brighter area on the iris on the opposite side of the main highlight/reflection.
e– Smooth dark edge surrounding the iris.
f– Recessed Iris – The iris is not so recessed in reality, it is actually quite plane. However, by pulling back the pupil, we emphasize the refractive effect of the cornea and the liquid that exists inside the eye, instantly looking more alive.
g– Solid cornea – It is very important to model the cornea with thickness so that you can use an Index of Refraction and slightly distort what is behind it. In this case I have used an IOR of 1.4.
h-Milky sclera – The white of the eye has a milky look and shouldn’t be represented as bright white. I have used the VrayFastSSS2 shader with subsurface scattering to achieve that look.
i-Wet look:Tear line in the contact area between cornea and eye lid – I have created a spline with thickness, converted it to Editable Poly and changed it’s shape in order to achieve a watery look.
Composition

 One trick I use to test the composition of a scene are “paint-overs”.
I bring an image into Photoshop and extend/crop the canvas size, twist it, paint new elements, change colors, etc. It is a quick and dirty method to preview changes. If I like them, I recreate them in 3D.
Image 18 (Fig.18) is one of those tests. In this one I took some decisions like placing an ashtray near the character and a few framed paintings on the back. I have decided to flip the image horizontally because it works better as we read it from left to right. I have also added a little tilt to make the composition less static. The rabbit’s eyes are at a one third distance from the top and from the right side in order to become the center of our attention.
In the final composition (Fig.19) I had some trouble in order for the Mona Lisa not to compete with the rabbit in terms of attention. For that I had to let the rabbit’s ear slightly overlap Mona Lisa’s frame, so that it became obvious that the painting was behind the rabbit. Also, I have intentionally left Mona Lisa’s eyes out of the picture
Compositing
 Photoshop was used for all the compositing. I had already made a lot of lighting and material tests in 3DSMax, as such I didn’t find it necessary to create render passes to fine tune further the lighting, reflections, etc.
I have rendered 3 separate hair passes (body, snout, tail) by setting the “Composite Method” to None in the “Effects>Hair and Fur” window. I have rendered the base image with the hair shadows but without the hair by setting the “Composite Method” to Off in the “Effects>Hair and Fur” window. A Z-depth pass was also rendered and used to defocus the background with the “Lens Blur” filter in Photoshop. In addition to these I have rendered an occlusion pass using Mental Ray which I consider to have a far superior occlusion shader comparing to Vray’s Dirt shader.
To finalize the image, I have painted some dirt marks on the wall and on the floor, painted the smoke in the air and coming out of the cigarette and added more light coming from the top right corner by painting over the image with the “Color Dodge” blending mode.
Conclusion
The technical aspects of a piece are important, but what really matters is the reaction it provokes on the viewer. I like humourous images and to make people smile. That was the main goal of this piece. I have introduced some secondary comic elements on the image like the smoking Mona Lisa or the Carrot earring, because it is fun for the viewer to find the jokes as he explores the image. I am very happy with the way the final image turned out.
I hope you have enjoyed this article as much as I have enjoyed writing it!